-------------------------------------
Let's recap and see where we stand. Remember, our goal here is to set up a web server on Linux that is capable of serving interactive mapping applications. We spent yesterday prepping our system and getting the Linux OS installed. Next we downloaded and setup a Java Virtual Machine which will enable Java applications, such as the MapXtreme Server to run. Finally, we installed MapXtreme Java edition. Running the MapXtreme administrator, itself a Java application, let us configure the server and view live maps in a desktop application. That was plenty to accomplish in one day. Next we'll install web server software and deploy a mapping application on this server.
There are many ways to create and deploy web applications ranging on the low end from simple CGI applications all the way up to dedicated web application servers. Sticking to our theme of platform independence, and trying not to get overly complex, I decided to go with a Java Servlet. A servlet is Java code that executes, of course, server side. Everyone is familiar with Java applets - applications written in the Java language that run inside of a web browser. Servlets are also created with the Java language, but run on the web server. Your web server software will need to support servlets. Most current web servers either already have servlet support, or it is promised in a future release. To learn more about servlets before continuing, you might want to visit Servlet Central or go directly to this nice overviewat developer.com.
Sunday, 10:00 am
Prepare physically. I'm up and at 'em like a kid on Christmas morning, bubbling with the anticipation of serving my first maps through a Linux web server. The large dark and sweet from Dunkin Donuts doesn't hurt either. For background noise, I went with ZDTV. ScreenSavers repeats are just as good the second time around, and will provide the inspiration for the project at hand.
Sunday, 10:45 am
Install Web Server software. You have lots of choices here. Between Sun's website and Servlet Central, I counted over 20 web servers that support Servlets, and I'm sure that's not a full list. Today I decided to go with vqServer from vqSoft (http://www.vqsoft.com/) for 3 reasons:
- It is written in Java, so it should run anywhere including here on Linux.
- It is a web server and Servlet runner in one nice package. No need to bother with external servlet support modules.
- It's free of charge, easy to setup and administer, and powerful!
Sunday, 11:00 am
Download the Java Servlet Development Kit (JSDK). The JSDK provides the class files that vqServer, or any other Web server that wants to run servlets, will need. You can get this file directly from sun at
http://java.sun.com/products/servlet/ . The archive to download is named jsdk20-solaris2-sparc.tar.Z. After decompressing the file, you will find a file in the /lib directory named jsdk.jar. In the next step, we'll add this
file to our Classpath so that the web server has access to all of the servlet specific class files in this library.
Sunday, 11:15 am
Starting the webserver. From a command prompt, set your current directory to wherever you installed the vqServer files in the previous step. As the webserver is the same process that will be running our Servlet application, it will need to know where to find the classes that make up the MapXtreme server, as well as the JSDK classes. Therefore make sure you start vqServer with both sets of classes on your path. Here's my command line; substitute the directories appropriate for your system:
jre -cp classes/classes.zip:
/opt/jsdk/lib/jsdk.jar:/opt/mapinfo/server
vq.server.console
To verify that your webserver is running, try viewing a page in your browser. My machine's name is dingleberry, so I entered http://dingleberry in my browser. You should see a default homepage as provided with the vqServer, which you can edit by going to /opt/vqserver/public and loading index.html into the text editor or HTML editor of your choice.
Sunday, 11:45 am
Install and compile the servlet. A basic mapping servlet complete with source code is included with MapXtreme Java edition. The .java source files are located in the /sampleapps/java/servlet directory where you installed MapXtreme. Load MapperServlet.java into your text editor and scroll down a page. At line 35 of this file, you'll find five constants that look like this:
private static final String host = "localhost";
private static final int mapPort = 8095;
private static final int adminPort = 8090;
private static final String geoset = "WORLD.GST";
private static final String webServer = "http://localhost";
In most cases, they should be fine as is. However, I would suggest setting 'host' to the IP of your server and 'webServer' to the true URL of your webserver's home URL. Save your changes and exit.
It's time to compile the two Java files that make up our servlet. At the command prompt, enter the following two lines to compile the source. Again, substitute the path appropriate for your system:
javac -classpath /opt/mapinfo/server:
/opt/jsdk/lib/jsdk.jar
MapperServlet.java
javac -classpath /opt/mapinfo/server:
/opt/jsdk/lib/jsdk.jar MapJqueue.java
You'll now notice a number of .class files have appeared in this directory. These files are your compiled servlet. In the next step will put them in a directory where the webserver can find and execute them.
Sunday, 12:30 pm
Configure vqServer for the Mapping Servlet. Let's create a subdirectory to contain our servlet in vqServer's directory structure. I called mine /opt/vqserver/servlets/WillMapper in honor of Will Willbrink, the engineer
at MapInfo who created the original source for this servlet and taught me all about Java servlets. Copy the .class files created in the previous step to this directory. We now need to create an alias so that the web server knows how to find the class files. Think of an alias as a 'mapping' (not in the GIS sense!) of web URL's to physical resources on the server's harddisk. We are going to create an alias known as /servlet/willwill that will direct the webserver to execute our java class
/opt/vqserver/servlets/WillsMapper/MapperServlet.class.
Administration of vqServer is conducted in a web browser, so fire your's up and go to http://YourMachineOrIP:9090/ Notice that by default the administrator is run on port 9090. Once in the administrator, click the 'Aliases' link. You'll be presented with a list of all of the default aliases. Click the 'New Alias' link and complete the form to define your alias. My settings are:
Alias Name: /servlet/willwill
Real Name: servlets/WillsMapper/MapperServlet
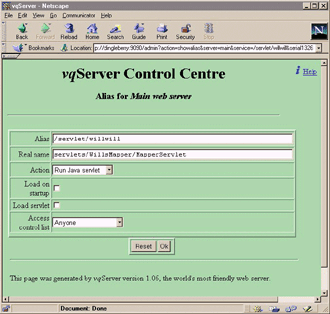
Hit the OK button to make it official.
Sunday, 1:15 pm
Browse your new mapping servlet! Still in your web browser, it's time to now run the application. Enter a URL like this in your browser:
http://YourMachineOrIP/servlet/willwill
A map should now appear along with some navigation tools for panning and zooming. Click on the map with one of the tools and the map will update. The Java source code is very straight forward, so making basic modifications to the servlet should not be a problem. Just remember to recompile and stick the new .class files in your live directory.

I hope you enjoyed this weekend project. If you have any questions, suggestions or comments regarding this project I'd love to see them; drop me an email. Interesting thing to note - although we focused entirely on Linux, everything we did is completely platform independent. We installed a Java VM, Web server and mapping engine - all are 100% Java and can be run anywhere. Time to dust off the Amiga again! Who's going to be the first to serve maps on BeOS?
Back to Part One.