Editor's Note: See the many graphics accompanying this article at the bottom of the text portion.
In June and July of 2011, the Missouri River reached levels last seen during the great flood of 1993. I was assigned to aerial photography as we watched for levee breaches along 140 miles of river from south of Atchison, Kansas to the Iowa state line. On August 1, flood detail suddenly turned to a months-long search and recovery operation after Missouri State Trooper Fred Guthrie and his dog, Reed, went missing on a flood-scoured highway west of Mound City, Missouri. Our photos provided situational awareness for the State Emergency Management Agency, the Missouri State Highway Patrol and other law enforcement agencies working the flood and the recovery operation.
All of this quickly added up to thousands of image files and full memory chips on my Nikon D-80, with no record other than scribbled notes and my own middle-aged memory to document locations for each. Ideally, I wanted to write lat-long coordinates to the EXIF (Exchangeable Image File) data embedded in each image file, where text information such as date and time, shutter speed and exposure are already kept. Newer, GIS-enabled digital cameras already have this functionality. There are camera attachments that will do this, too, but I’ve heard varying reports on how well they work and I wasn’t going to drop a few hundred bucks to find out. I also wasn’t keen to spend similar coin on a Garmin hand-held to record flight tracks as I already had a GPS-enabled iPhone.
Whatever solution I came up with would require two components: a method for collecting GPS coordinates and a geotagging application for assigning lat-long to images and writing the data into each image’s EXIF file.
Component 1: Collecting GPS Coordinates
For this part of the problem, I used an iPhone app called GeoTagr (formerly GeoLogTag), developed by Galarina and purchased through the iTunes App Store for $4.99, as opposed to a $350 Garmin.
The premise behind GeoTagr is simple:
- First, you precisely synchronize (to the second) GeoTagr’s clock with the clock on your camera.
- Next, GeoTagr will record location points at intervals you select, either continuously or at intervals of 3, 5 or 10 minutes. Location data can be taken from GPS or derived from either Wi-Fi access points (good for urban areas) or cellphone towers. It is possible to add points manually as you shoot, but if you want hands-free operation and if fine temporal resolution is needed, continuous recording mode is the answer.
- Finally, GeoTagr generates a .GPX (GPs eXchange format) file, an open-source XML format that is used to describe points, routes and tracks, and to store other data such as elevation.
- You now have a track populated with time-stamped x,y points that can be imported into your computer.
Component 2: Correlating and Embedding the Data
For the second half of this process I used a freeware app for Windows called GeoSetter, a tool for displaying and changing EXIF metadata in digital image files. While it is possible to modify some EXIF data within Windows, GeoSetter offers a much nicer interface for working with image files, particularly en masse.
One of GeoSetter’s functions is synchronizing image files with .GPX tracks based on time stamps. Here’s where that GeoTagr “tracking interval” setting becomes critical. Did you set your interval for five minutes and take eight photos in 90 seconds starting four minutes and 45 seconds ago? Uh oh… they will all be geotagged with coordinates from the closest available clock time, in this case, the same one! Not very useful for a quick sequence of images taken from a fast-moving airplane.
My initial-phase workflow for batch georeferencing a set of photos in GeoSetter was basically this:
- Import the .GPX tracks created in GeoTagr. Our track file from a two-hour flight contained 4,035 points recorded in continuous mode and was 614k in size (the Help file gives a size estimate of 1Mb for 10,000 location points). As tracks are loaded, they will display in the Map window over a Google Maps backdrop.
- Find your images. Open the folder containing the image files to be time-synched and georeferenced. You can adjust how they are displayed in the Image Files window, for example, details vs. thumbnail view.
- Select the images to be processed, one at a time or in bunches. From the Images menu, perform a “Synchronize With GPS Data Files” operation. Coordinates will be added to whatever image(s) you’ve selected, and indicated with position markers on the map.
When changes are saved, the coordinates are embedded in the image file(s) EXIF data and will be visible to other users.
Adjustments
This basic approach was a good, quick-and-dirty way to get me in the ballpark for verifying my images against Google Maps (other backdrops are available), particularly when I couldn’t recognize the general locale of a photo, for example, a close-up of damaged outbuildings or sand deposition across a road. But depending on circumstances, assigned coordinates may not line up well with actual locations. For example, in our situation:
- The .GPX track points were based on the position of the airplane and not the features being photographed.
- Was this a high-angle or a low-angle shot? Will we find the feature of interest 200 feet off the flight track, or half a mile from it?
- Which way was the camera pointing? A feature could be located anywhere within a 360-degree radius of the aircraft, depending on the camera’s range of motion and the aircraft’s bearing.
- Are there “holes” in the recorded point track that might throw off location plots? Are there differences between camera and recording track clock times?
GeoSetter gave us a number of tools for easily adjusting point positions, their coordinates and related data, including:
- Drag and Drop. If the feature you’re georeferencing is 600 meters off your flight track, simply drag and reposition the corresponding point on the map display. The lat-long figures will automatically adjust. Same with Image Direction, which will change as you use the interface.
- Time Differential. If there is a discrepancy between track time and camera clock time, you can make plus-or-minus time adjustments. These will move your positions forward or backward accordingly along the track.
A logical extension of this workflow is production of media for various users, perhaps an interactive Google Earth program for decision makers and field personnel. GeoSetter will output .KMZ files containing tracks, map points and images/thumbnails that can be e-mailed or otherwise distributed.
Overall Usability
The current version of GeoTagr is more intuitive and much improved over the GeoLogTag version I worked with in mid-2011. For whatever reason, there were a lot of gaps in flight tracks with the old version and I about “cooked” my iPhone making sure it had a view to the sky, which did not solve the problem. There were no such gaps with the current version and where points were sparse; the flight track path (not the line of gathered points) was interpolated and intact. I was able to put the phone in my shirt pocket and work away. Temporal resolution in continuous recording mode was sufficient to provide different coordinates for images taken two seconds apart.
Once I got the hang of GeoSetter, I found it very easy to work with. Going through the learning curve was a bit of a chore, in part because I had to figure out what I was trying to accomplish. Using the workflow I’ve outlined as a starting point should make things easier, and a number of workflows are mentioned in the Help file.
Besides, it’s freeware.
To write data to EXIF files, GeoSetter’s engine is the ExifTool by Phil Harvey, a command line application, also available as a stand-alone for WIN and Mac OS X at http://www.sno.phy.queensu.ca/~phil/exiftool/ -- GeoSetter will notify you when ExifTool updates are available. If you’ve got a serious urge to tinker with EXIF and other camera annotation formats, this is a great place to start.
Another geotagger program recommended by GeoTagr is RoboGeo (licenses start at $79.95 on www.robogeo.com), which will also create and export shapefiles to ArcGIS, .DXF files to AutoCAD, and geocoded photos/tracklogs to Microsoft Map Point.
Out-of-Pocket Expense: 5 Bucks.
There are a number of apps out there that will accomplish what I’ve outlined. I didn’t spend a lot of time looking or researching, yet I’m very pleased with these solutions, particularly after the GeoTagr upgrade. For a “quick and dirty” approach going in, this is a very solid outcome I continue to use.
GRAPHICS (Click for larger image)
|
|
The Missouri River rose to record flood levels in northwest Missouri during the summer of 2011. (Photo by the author. Pilot: Sgt. Kevin Haywood. Courtesy: Missouri State Highway Patrol.) |
|
|
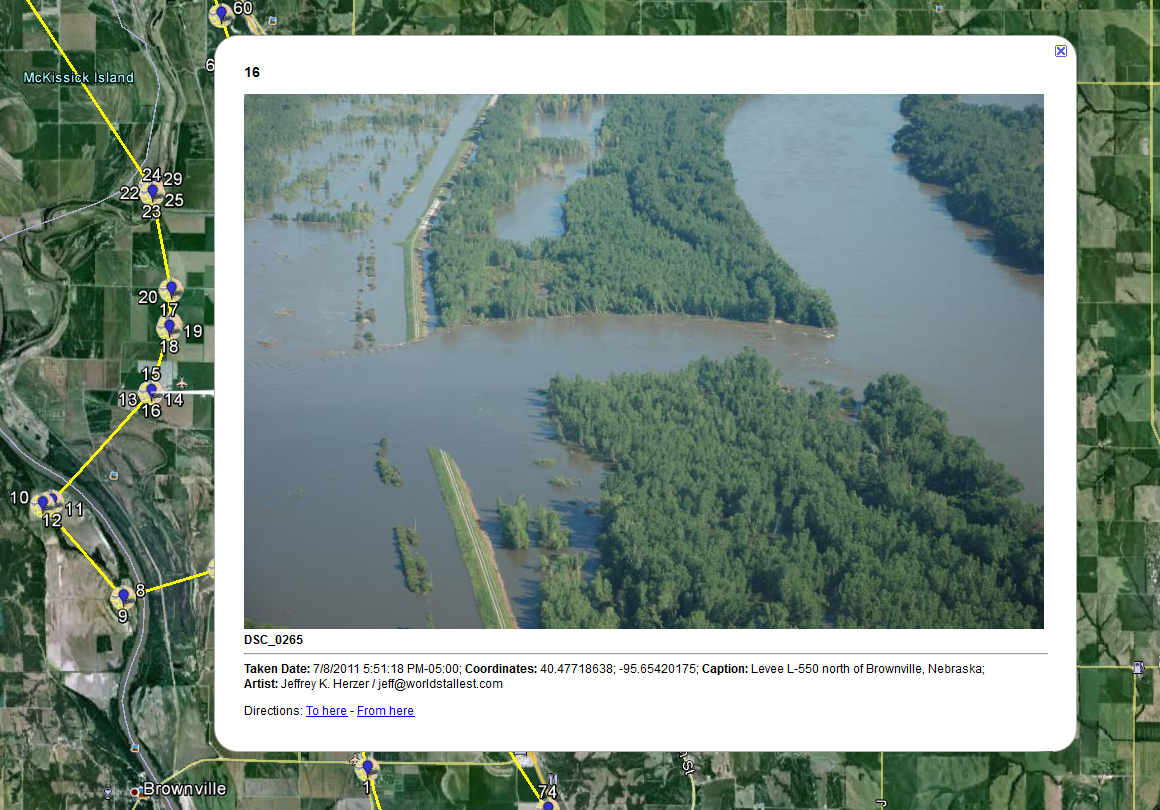
Missouri River floodwaters destroyed levees and farmland, and took the lives of Missouri State Trooper Fred Guthrie and his canine, Reed at this location during the Summer of 2011. (Photo by the author. Pilot: Sgt. Kevin Haywood. Courtesy: Missouri State Highway Patrol.) |
|
|
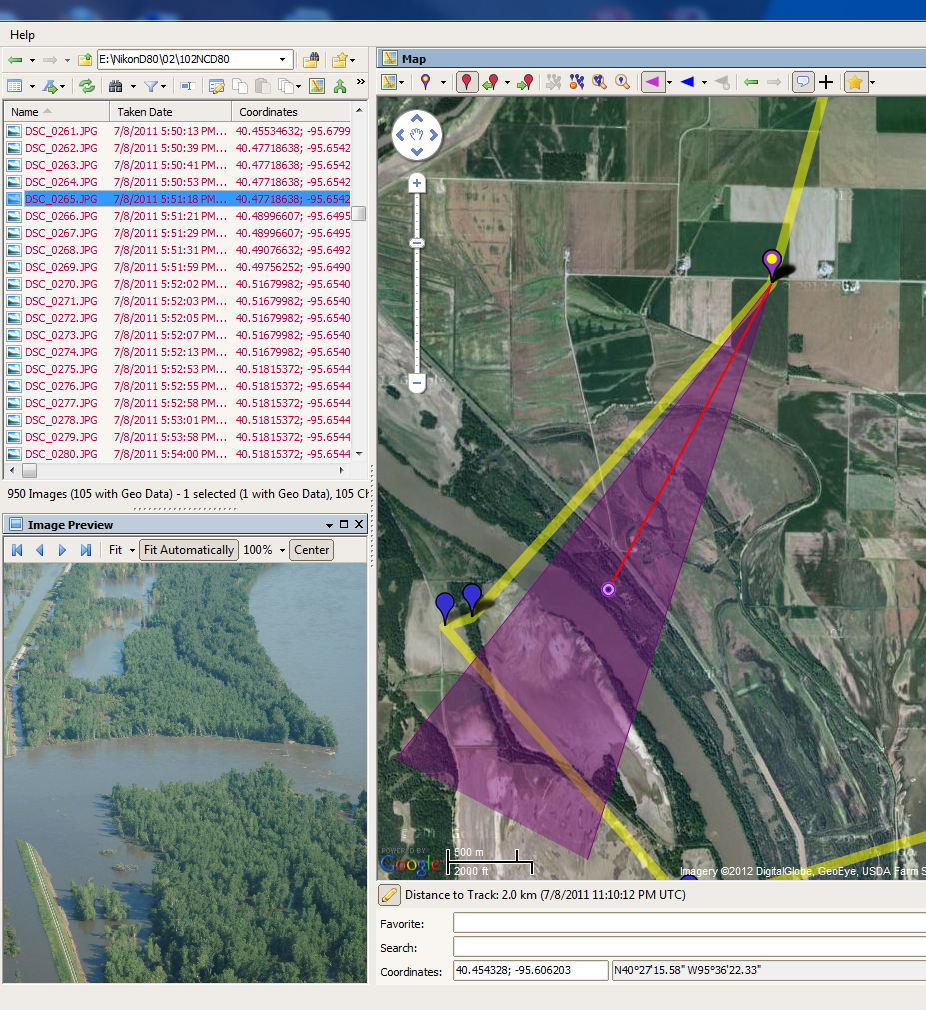
The GeoSetter interface with a GPX track displayed and image files ready for geotagging. Google Maps image by USDA Farm Service Agency, Copyright ©2012 Google, GeoEye and TerraMetrics.
|
|
|
GeoSetter synchronizes image files with GPX tracks based on shared clock times. The synchronization can be adjusted or interpolated if there are clock discrepancies. |
|
|
GeoSetter has synchronized images with positions on the GPX track based on shared clock times. Positions for images are displayed on the map. When the work is saved, GPS and other data will be written to the EXIF data embedded within each image file.
|
|
|
X,Y coordinates for each image file and camera direction can be adjusted with a mouse within the GeoSetter interface. Google Maps image by USDA Farm Service Agency, Copyright ©2012 Google, GeoEye and TerraMetrics.
|
|
|
GeoSetter will create .KMZ files for display in Google Earth. Tracks and feature points can be included, and a click on a point will produce a corresponding image with customizable caption information. Photo by the author. |
|
|
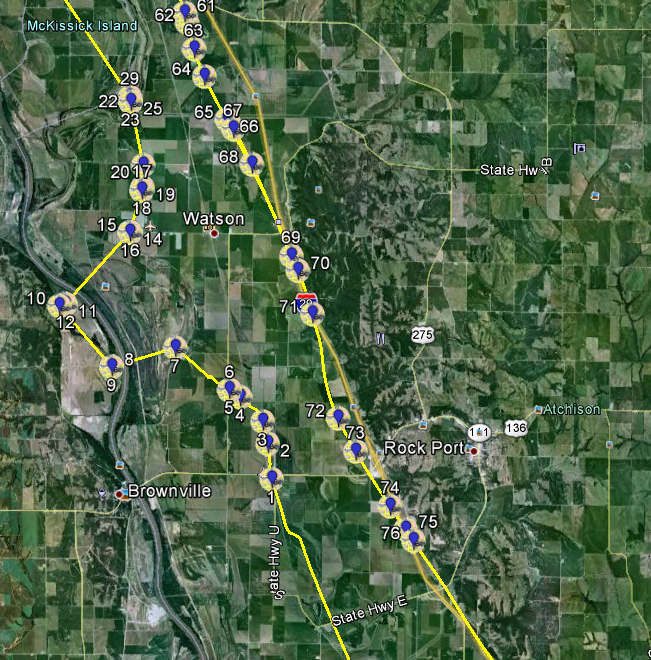
GeoSetter will create .KMZ files for display in Google Earth. Tracks and feature points can be included, and a click on a point will produce a corresponding image with customizable caption information. Google Maps image by USDA Farm Service Agency, Copyright ©2012 Google, GeoEye and TerraMetrics.
|
|
|
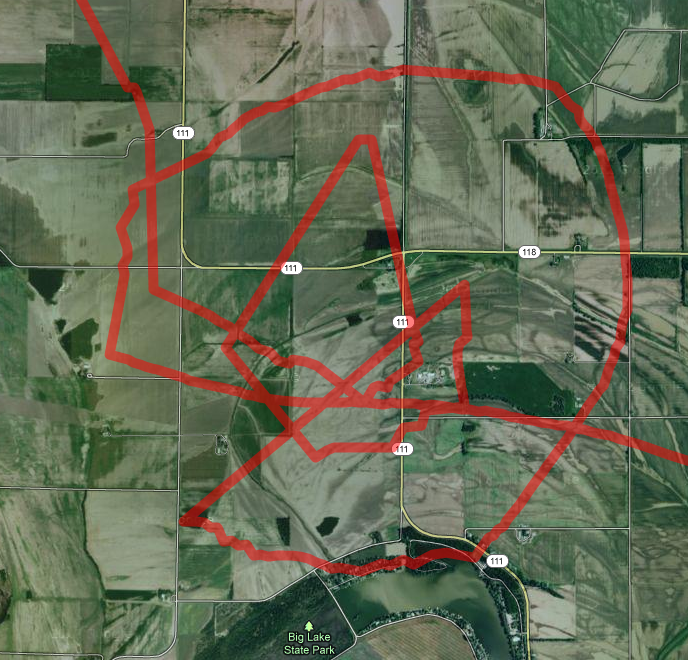
GeoTagr can collect points continuously, with temporal resolution sufficient to give different coordinates to aerial images taken two seconds apart. Here, GeoTagr handles aircraft orbits around a search and recovery site. Google Maps image by USDA Farm Service Agency, Copyright ©2012 Google, GeoEye and TerraMetrics.
|
|
|
The GeoTagr “Tracks” interface shows your position as you travel and generates GPX files for import into your computer. |
|
|
To synchronize positions within GeoTagr to photos taken with your camera, you must synchronize your camera clock with the app, preferably to the second. |
|
|
GeoTagr will send recorded tracks to your Dropbox.com account for transfer to your computer, for use with your favorite geotagging program. It will also scan images to online services – Dropbox, Flickr and Google+ among them – and write coordinates to stored image files. |


Reprinted with permission - Copyright ©2012, World’s Tallest Media, Inc.
Google Maps image by USDA Farm Service Agency, Copyright ©2012 Google, GeoEye and TerraMetrics.