In part one, we talked about XML Web services, and the value they bring to the GIS and business geographics world.Hopefully this left you wanting to learn more, and to see how XML Web services can be used practically in applications that need to provide mapping and other related location based functionality.Here in part two, we will examine a real application built with the Microsoft MapPoint .NET XML Web service to get a first hand look and an appreciation of the simplicity this new generation of location technologies brings to your applications.The application is built with Visual Basic and runs on your desktop like any other Windows application. It makes calls to the MapPoint .NET service to do street address geocoding, place finding, map rendering, and multi-point driving directions calculations. Since we are of course building it with XML Web services, it will be lightweight; will not require any data installation on your machine, and all of the mapping specific code will fit on a napkin.
Although we will be looking at code in a moment, even if you are not a programmer, there is much here of interest for you.We will get started by installing and running the compiled application. No programming skills needed.We will walk through the application and examine its functionality piece by piece, feature by feature.
We will be using the MapPoint .NET
Web service to provide the mapping functionality needed by the application.
MapPoint .NET is a hosted Web service, exposing it's functionality via
a simple SOAP API.This single, easy to learn API is used by developers
to build location intelligence into their applications.The same API used
by a developer in Italy is used by a developer in the United States.Driving
directions, map rendering, Geocoding, reverse Geocoding, proximity search,
and all of MapPoint's functionality is available via this same API.Web
developers, desktop developers, mobile developers, you guessed it, the
same API.
Running the application
There are two things you need to
do in order to run the application.First, you will need to have the .NET
framework runtime installed.If you don't already have it, you can get
it here:
Next, you will download the compiled, ready-to-run application here:Save the zip file anywhere on your system and extract the DirectionsmagTutorial.exe file.Double-click on the .EXE to run it.
The application lets you add a number
of stops to a route, one at a time.When all of the stops have been added,
you can hit the 'Get Route' button to generate driving directions.Here
is a screen shot of the running application:
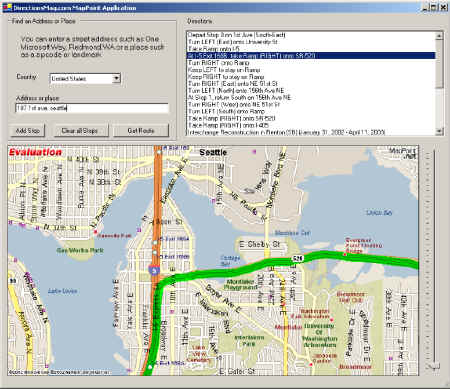 Start by adding your first stop.Choose
your country from the dropdown list, and then enter a place or street address.
If entering a street address, make sure you include a city or zip code.
The following are examples of valid input:
Start by adding your first stop.Choose
your country from the dropdown list, and then enter a place or street address.
If entering a street address, make sure you include a city or zip code.
The following are examples of valid input:
- Madison st & 4th ave, seattle
- 90 Birch Drive, Pleasantville, NY
- Fresno
- Shea Stadium
- SFO
- ·90210
Building the application
For the application programmers
reading this tutorial, we will now look at the Visual Basic source code
that drives the application.
Requirements to follow the tutorial:
- Visual Studio .NET - This is the Integrated development environment we will use for building the application
- A MapPoint .NET developer account.If you don't have your own, you can use the shared account that was created for this tutorial:
- UserID - 2330
- Password - YUzRJ9Be (CaSe MaTteRs!)
- Expires - 31-Jan-2003
- The source code and related files for the Visual Studio .NET project
- Download
the source code here
http://www.microsoft.com/mappoint/net/evaluationDownload and unzip the project anywhere on your system.Start Visual studio .NET and open the .SLN (solution) file. You're now ready to follow along as we look at the major areas of the application.
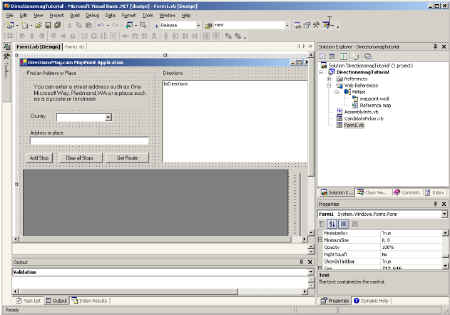
The User Interface
Once the project has loaded, your
desktop should look much like the screenshot below.The UI is completely
standard and like every other Visual Basic application you've ever looked
at.After all, that's one of the major benefits of XML Web services - you
use them right where you need them, in all of the programming environments
that you're already used to, utilizing any of the programming languages
you are familiar with.No surprises."OK People, there's nothing to see
here.Move along."
 The Web Service Reference
To make our development tool aware
of our Web service, we add a Web reference to the project.In the solution
explorer (CTRL-ALT-L to display it), you will see a folder called Web References.
Here you will find an entry for each referenced XML Web service in your
application.In this case, we have just one - The MapPoint .NET service.
It has been renamed MPNet to keep our code easier to read.Click on the
MPNet service to view its properties.The 'Web Reference URL' property
is the WSDL file that we talked about in part one.It is an explicit URL
that points to the definition of all of this Web services functionality.
To add another Web service to the project, you would use the 'Project -> Add Web Reference...' menu choice. This brings up the 'Add Web reference' dialog where you can specify and valid WSDL file to be added to your project.
Once the WSDL file is specified,
you can immediately take advantage of any of its functionality.The only
missing link is security.How is access to the Web service controlled?
How are authentic requests distinguished from unauthorized access attempts?
The MapPoint .NET service uses Digest Authentication to validate each request
made to the service.This is the reason you need to sign up for credentials
before you are able to use the service.Remember, for the purpose of this
tutorial, temporary credentials have been supplied to you.If we look at
the Form1's Load() event, you will find the code that takes your MapPoint
.NET UserID and password and instantiates NetworkCredential objects for
each of the services we will be using:
myFindService.Credentials = New NetworkCredential("2330", "YUzRJ9Be")
myRenderService.Credentials = New NetworkCredential("2330", "YUzRJ9Be")
myRouteService.Credentials = New NetworkCredential("2330", "YUzRJ9Be")
It's that simple.Once your legitimate
credentials are set, each call your application makes to the service will
be validated.
The Geocode
When the 'Add Stop' button is pressed,
we need to geocode whatever was entered in the search field.It could be
a full street address, or perhaps just a place descriptor such as a landmark,
city, post code, etc...The MapPoint .NET Web service provides a method for
performing a street geocode and another method to geocode place descriptors.
Our strategy here will be to try the input as a street, and if no good
results are found, make a subsequent call to try a place search.As an
added bonus, the FindAddress() method can be passed an unparsed address
string, which will be parsed and geocoded in one step.Here is the code
to perform the Street Geocode:
'Initialize the centerpoint to null.If we find a good match, set it
CenterPoint = Nothing'Based on the selected Country, select a MapPoint Datasource to search
If cmbCountry.Text = "Canada" Or cmbCountry.Text = "United States" Then
myDataSourceName = "MapPoint.NA"
Else
myDataSourceName = "MapPoint.EU"
End If
TryWe simply populate an Address object and pass it to the FindAddress() method.Note that if you have discrete address component fields for street, city, state, and postcode, you can pass these in the Address object as well.
'Start by trying the input as a Street Address.If we don't make a
'hit, we will then try the input as a place.'Populate a FindAddressSpecification with the search options
Dim findAddressSpec As New FindAddressSpecification()
findAddressSpec.InputAddress = New Address()
findAddressSpec.InputAddress.FormattedAddress = txtStreet.Text
findAddressSpec.InputAddress.CountryRegion = cmbCountry.Text
findAddressSpec.DataSourceName = myDataSourceName'Try to find the address
Try
foundAddressResults = myFindService.FindAddress(findAddressSpec)
Catch ex As System.Web.Services.Protocols.SoapException
'An error occured during the search.
foundAddressResults = Nothing
End Try
Next we need to check to see if any
valid matches were found.If we have a single good match, we will set the
CenterPoint variable with the coordinate.If more than one good match was
found, we will display a dialog to the user allowing them to select one
of the candidates.
'Did we get any results?Finally, it's possible that no matches or candidates at all were found.If this is the case, chances are good that the user didn't enter a complete address, but instead, just a place description such as '90210', 'Dallas', 'Space Needle', or 'SFO' for example. In this case, we make a call to MapPoint .NET's Find() method to geocode the place.
If (Not foundAddressResults Is Nothing) Then
'If we have exactly one hit, use it as the centerpoint for this stop
If foundAddressResults.NumberFound = 1 Then
Dim fr As FindResult = foundAddressResults.Results(0)
CenterPoint = New LatLong()
CenterPoint = fr.FoundLocation.LatLong
myViews(0) = fr.FoundLocation.BestMapView.ByHeightWidth
End If'If more than one candidate, show a dialog that allows the user to choose one
If foundAddressResults.NumberFound > 1 Then
Dim frm As New CandidatePicker()
frm.ShowDialog(Me)
End If
End If
'If searching as a street address didn't yield a hit, lets try a place findNote that in each case that a location was found, we took the location's BestMapView and saved it in an array of MapViews.We will use this as the initial view for our map in the next section on MapRendering.The advantage of hanging onto this view versus creating a view at the found coordinate is that the MapPoint .NET service will have set for us the optimal zoom and scale for the map based on what was found.The best view of a street address is different than a city which is different than a landmark.By using the provided View, we know we will get an appropriate initial Map.
If CenterPoint Is Nothing Then
Dim findSpec As New MPNet.FindSpecification()
findSpec.InputPlace = txtStreet.Text
findSpec.DataSourceName = myDataSourceNameDim foundResults As MPNet.FindResults
foundResults = myFindService.Find(findSpec)'If a place was found, we will use the first candidate as our stop.
If Not foundResults Is Nothing And foundResults.NumberFound > 0 Then
Dim fr As FindResult = foundResults.Results(0)
CenterPoint = New LatLong()
CenterPoint = fr.FoundLocation.LatLong
myViews(0) = fr.FoundLocation.BestMapView.ByHeightWidth
End If
End If
The Map Render
MapPoint .NET's GetMap() method
provides a host of options for returning aesthetically pleasing maps to
your application.You can request a map with a variety of options including
routes, styles, and custom icons, and choose to have the map returned as
a gif image directly to your application or as a fully qualified URL path
to be embedded in a web application.You can perform advanced drawing and
annotation on your maps as well (see the territory demo at http://demo.mappoint.net
for a good example of this).The GetMap() method takes a MapSpecification
object as a parameter.Here is where you specify the size and format of
your map, along with all of the other parameters just mentioned.
In our application we will request
a map of the current location and specify that we want the binary of the
rendered map returned directly to our application.We will then display
it in a picture box on our form.After all of the parameters are set, GetMap()
is called and the returned MapImage object is displayed on our form with
just one more line of code.
Dim mapSpec As New MPNet.MapSpecification()
mapSpec.DataSourceName = myDataSourceName
'Request the map sized to fit in our picturebox
PixelWidth = pbMap.Width
PixelHeight = pbMap.Height
mapSpec.Options = New MPNet.MapOptions()
mapSpec.Options.Format = New MPNet.ImageFormat()
mapSpec.Options.Format.Height = PixelHeight
mapSpec.Options.Format.Width = PixelWidth
'MapPoint .NET supports many MapStyles.We will go with 'Road', but
'have fun and experiment with some of the others, such as terrain
mapSpec.Options.Style = MPNet.MapStyle.Road
mapSpec.Options.FontSize = MapFontSize.Smaller
mapSpec.Pushpins = StopPins
mapSpec.Views = myViews
mapSpec.Route = myRoute
'Make the call to the MapPoint .NET service and display the
'resulting map in the picturebox
Dim mapImages() As MPNet.MapImage
mapImages = myRenderService.GetMap(mapSpec)
pbMap.Image = _
New Bitmap(New System.IO.MemoryStream(mapImages(0).MimeData.Bits))
To make the map interactive (allow
pan and zoom), we will hang onto the MapView that was used in the getMap()
request.We can use this later in the MouseDown() event for the picture
box to re-center the map.Given the Mouse click location in Pixels, we
can ask the RenderService to convert the coordinate to a LatLong object.
Then of course a new map can be requested at this newly derived coordinate,
like this:
Dim pc As New MPNet.PixelCoord()
pc.X = e.X
pc.Y = e.Y
Dim points(0) As MPNet.PixelCoord
points(0) = pc
'Convert from pixels to LatLong
myViews(0).CenterPoint = myRenderService.ConvertToLatLong( _
points, myViews(0), PixelWidth, PixelHeight)(0)
Driving Directions
Once the user has created at least
two stops for the route, they can hit the 'Get Route' button to request
driving directions and a map highlighting the route.We start by creating
an array of SegmentSpecification objects, one for each stop.A SegmentSpecification
holds the coordinate of the Stop, and its name.Here is the code to request
the route from the MapPoint .NET service:
'Add each stop to a RouteSegmentSpec object
Dim ThisStop As Integer
Dim routeSegmentsSpec(NumberOfStops - 1) As SegmentSpecification
For ThisStop = 0 To NumberOfStops - 1
routeSegmentsSpec(ThisStop) = New SegmentSpecification()
routeSegmentsSpec(ThisStop).Waypoint = New Waypoint()
routeSegmentsSpec(ThisStop).Waypoint.Name = "Stop " & ThisStop
routeSegmentsSpec(ThisStop).Waypoint.Location = New Location()
routeSegmentsSpec(ThisStop).Waypoint.Location.LatLong = _
StopPins(ThisStop).LatLong
Next
Dim routeSpec As New RouteSpecification()
routeSpec.DataSourceName = myDataSourceName
routeSpec.Segments = routeSegmentsSpec
'Request the route and directions from the MapPoint .NET service
myRoute = myRouteService.CalculateRoute(routeSpec)
As you can see, the CalculateRoute()
method takes a RouteSpecification object as it's sole parameter.The RouteSpecification
contains everything, including the set of stops, that MapPoint will need
to generate directions.You have the ability to specify a number of additional
options on the RouteSpecification that are not shown here such as driver
profile information and shortest route/fastest route preference.
Once the route is calculated, it is easy to iterate through the individual turn instructions and display them in a list box, text box or whatever your User Interface calls for.
'Loop through each segment, and each segment's directionsIn this case, we add an element to a list box for each instruction.The user can then select any instruction in the list to quickly center the map there.
'Put the text of each turn in a list box
lstDirections.Items.Clear()Dim myDirection As Direction
Dim thisSegment As Segment
Dim segmentNumber As Integer = -1
Dim locs(myRoute.Itinerary.Segments.Length - 1) As LocationFor Each thisSegment In myRoute.Itinerary.Segments
segmentNumber = segmentNumber + 1
locs(segmentNumber) = New MPNet.Location()
locs(segmentNumber).LatLong = thisSegment.Waypoint.Location.LatLongFor Each myDirection In thisSegment.Directions
lstDirections.Items.Add(myDirection.Instruction.ToString())
Next
Next
Summary
Hopefully this two-part article
has provided a good feel for what is possible today with XML Web services
and mapping applications.If you would like to learn more and start building
applications on your own, I would suggest downloading the MapPoint .NET
SDK.In addition to providing a detailed reference to the entire API, it
contains an exhaustive set of code samples in C# and Visual Basic for every
property and method in the API.You will also find tables detailing the
Cartographic and Point of Interest data in the service.You can find the
SDK at MSDN here:
http://msdn.microsoft.com/library/en-us/dnmapnet30/html/map_sdk3ntro.asp
Also, for developers using the Java language, you can find a good sample application here: