Brady Foust, formerly of Proxix Solutions, told me once
that the clue to the essence of how good the good old days really were,
as compared with today, could be summed up in two words, "modern
dentistry." So when I was scheduled for an hour and a half session to
replace a broken old filling, I was fairly confident it wouldn't hurt,
but an hour and a half seemed like a long time. I had no idea just how
cool it was really going to be.
My mouth was about to experience a new flavor: "dentistry GIS." My first clue was the second computer that rolled into the room. The first computer had my records on it, which, while colorful, were fairly bland. The second one, called the CEREC 3D Chairside Restoration System, was quite a different story.
I was told that after they removed the old filling and prepared the tooth, they were going to take a 3D digital photo of the tooth and surrounding area, push that image to the computer, and then create the filling to precisely fit the preparation. It would be mapped to the tooth, the surfaces and morphology adjusted as necessary, and then sent to a milling machine on-site, which would manufacture the filling out of a single, solid block of all-ceramic, tooth-colored material. The fit should be perfect and there would be no need to wait for the work to be done at a lab someplace else.
Hmmm. 3D digitizing from an image, exploring the topography, mapping the extents and then creating a surface and filling it. Sounded like GIS to me. The only thing missing was a coordinate system. Since my mouth was full of Novocain and tools when they told me all this, my reply was a very incisive and brilliant, "Oolphsys."
How does it work? This is really a multi-step, but not necessarily lengthy, process. Remember this is done in your dentist’s office during a normal appointment. This system is used for fillings, crowns, veneers and other methods of restoring teeth.
First, the tooth is prepared and set-up for the custom, all-ceramic restoration. This involves the usual clearing of decay and prepping with the always-popular grinding and drilling tools.
In this process, the topography of the tooth is carefully shaped to avoid sharp angles or the creation of weak areas or areas that might not provide the best adhesive seal. This preparation is not trivial, as the end product, a custom restoration, will last a very long time and will look like a brand new tooth.
In this example, the excavated area is the site for the restoration,
along with measurements of the minimum thicknesses. Note that the
restoration will have to accommodate the tooth above or below it. The
opposing tooth probably has a surface that will intrude into the tooth
being restored; therefore the restoration has to be designed to
eliminate any occlusal interference. In other words, the dentist will
do adjacent geographical accommodation. Issues like stress points are
evaluated by both the software and the dentist in order to avoid
problems with the tooth in the future. The result: permanent repair,
perfect fit, and it looks like a real tooth.
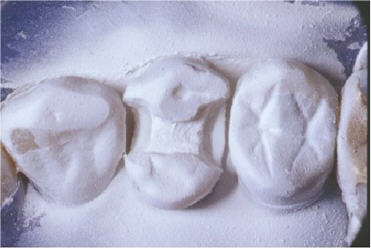
Following the prep work, the restoration areas are covered with an imaging powder which enhances the luminescence of the restoration area so it can be photographed with the CEREC 3D System’s built-in intraoral camera. Several images can be captured so that the total impact of the restoration can be seen on adjacent areas. Note that this is done in 3D so the shape of the restoration geography (in this case, the geography of a tooth is referred to as "clinical morphology") can be viewed from all angles, both for developing a perfect fit and to make sure it isn't touching or interfering with adjacent teeth, which could be a problem when biting and chewing.
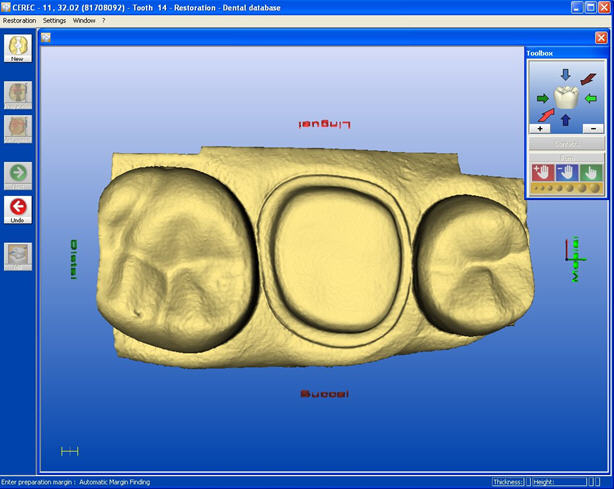
The preparation image is moved into the computer where the 3D fill is
instantly and automatically created by the CEREC 3D System. At this
point the dentist will adjust the geographical extents of the 3D fill
so they match exactly the actual preparation that was done on the tooth.
Note this image shows the placement of the camera and does not include
the luminescent powder.
The software allows for the creation of several models of the restoration so that the best restoration can be chosen. There is the possibility for unlimited fine-tuning prior to sending it off to the milling machine.
In this image, the area of the restoration and adjacent teeth can be
seen. Remember that this is a 3D model and it can be rotated in any
direction.
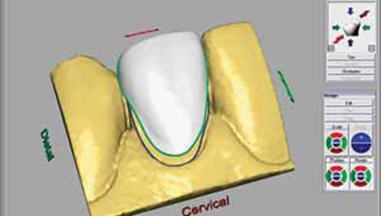
In this example, the restoration viewed on the computer screen uses the
green line as an adjustment line (it can be moved on the screen), so
that proximity to adjacent teeth creates proper spacing. The
restoration is seen here at the gum line.
When the final design of the restoration is complete, the file is saved (all of the models can be saved as well) and then sent to the milling machine for fabrication.
The milling machine creates the restoration in real-time using a blank from a selection of several different all-ceramic materials. Remember, color, tone and fit make the final restoration look like your natural tooth. Unlike metal ("silver") fillings and crowns, a CEREC 3D restoration is virtually imperceptible when compared with a natural tooth. No one will know you have it (except for you and your dentist, of course!).
When the 3D milling machine is done, usually in about 15 minutes, the dentist returns with a custom made, just-for-your-tooth restoration. If there was some error in manufacture, it can be corrected on the spot and re-done, without the old process of sending it back to the lab and having to put up with a temporary fix and another appointment.
You can see animations of the various processes.(You will need a Flash Player.)
Perhaps, the best thing about this entire experience is that it gets better as you spend time in the chair. That is, the first part - the Novocain and the high speed tool experience - is followed by quiet, non-invasive, and very cool high-tech stuff such as 3D GIS images on the computer. And best of all, you can watch it all as you sit in the dental chair. Not only is this a major technological step forward for dentistry, but now, getting the lollipop is no longer the coolest part of a dental visit.
My mouth was about to experience a new flavor: "dentistry GIS." My first clue was the second computer that rolled into the room. The first computer had my records on it, which, while colorful, were fairly bland. The second one, called the CEREC 3D Chairside Restoration System, was quite a different story.
I was told that after they removed the old filling and prepared the tooth, they were going to take a 3D digital photo of the tooth and surrounding area, push that image to the computer, and then create the filling to precisely fit the preparation. It would be mapped to the tooth, the surfaces and morphology adjusted as necessary, and then sent to a milling machine on-site, which would manufacture the filling out of a single, solid block of all-ceramic, tooth-colored material. The fit should be perfect and there would be no need to wait for the work to be done at a lab someplace else.
Hmmm. 3D digitizing from an image, exploring the topography, mapping the extents and then creating a surface and filling it. Sounded like GIS to me. The only thing missing was a coordinate system. Since my mouth was full of Novocain and tools when they told me all this, my reply was a very incisive and brilliant, "Oolphsys."
How does it work? This is really a multi-step, but not necessarily lengthy, process. Remember this is done in your dentist’s office during a normal appointment. This system is used for fillings, crowns, veneers and other methods of restoring teeth.
First, the tooth is prepared and set-up for the custom, all-ceramic restoration. This involves the usual clearing of decay and prepping with the always-popular grinding and drilling tools.
In this process, the topography of the tooth is carefully shaped to avoid sharp angles or the creation of weak areas or areas that might not provide the best adhesive seal. This preparation is not trivial, as the end product, a custom restoration, will last a very long time and will look like a brand new tooth.
 |
Following the prep work, the restoration areas are covered with an imaging powder which enhances the luminescence of the restoration area so it can be photographed with the CEREC 3D System’s built-in intraoral camera. Several images can be captured so that the total impact of the restoration can be seen on adjacent areas. Note that this is done in 3D so the shape of the restoration geography (in this case, the geography of a tooth is referred to as "clinical morphology") can be viewed from all angles, both for developing a perfect fit and to make sure it isn't touching or interfering with adjacent teeth, which could be a problem when biting and chewing.
 |
 |
The software allows for the creation of several models of the restoration so that the best restoration can be chosen. There is the possibility for unlimited fine-tuning prior to sending it off to the milling machine.
 |
 |
When the final design of the restoration is complete, the file is saved (all of the models can be saved as well) and then sent to the milling machine for fabrication.
The milling machine creates the restoration in real-time using a blank from a selection of several different all-ceramic materials. Remember, color, tone and fit make the final restoration look like your natural tooth. Unlike metal ("silver") fillings and crowns, a CEREC 3D restoration is virtually imperceptible when compared with a natural tooth. No one will know you have it (except for you and your dentist, of course!).
When the 3D milling machine is done, usually in about 15 minutes, the dentist returns with a custom made, just-for-your-tooth restoration. If there was some error in manufacture, it can be corrected on the spot and re-done, without the old process of sending it back to the lab and having to put up with a temporary fix and another appointment.
You can see animations of the various processes.(You will need a Flash Player.)
Perhaps, the best thing about this entire experience is that it gets better as you spend time in the chair. That is, the first part - the Novocain and the high speed tool experience - is followed by quiet, non-invasive, and very cool high-tech stuff such as 3D GIS images on the computer. And best of all, you can watch it all as you sit in the dental chair. Not only is this a major technological step forward for dentistry, but now, getting the lollipop is no longer the coolest part of a dental visit.
From Our Homepage
Saying Farewell to an Amazing Journey
Communicating with Maps
Is There a GIS Career Ladder?
What does it mean to be geospatially smart? Series
Ways Real Estate and Property Developers Utilize Melissa GeoData for Data-Driven Decisions
Unlocking Value From Daily Satellite Imagery and Insights
Maximizing the Value of Your Address Data with Geo Addressing
How Indoor Mapping Enhances the Security of Smart Buildings
Look Ahead: AI, Location Intelligence and Efficiency
Collaboration Takes on Sea Level Rise & Dynamic Technology Environments
Brownies for Brownfields
Has Everything Been Mapped Already?
How Is Data Literacy Changing in an Artificial Intelligence Landscape
Portfolios for GIS Professionals: More Than Just Maps
How to Create a Distance Matrix in QGIS - A Step-by-Step Guide
7 Ideas for Bringing GIS into the K-12 Classroom
The Geography of Movement