Mapping Solutions, LLC.
4660 South Hagadorn Road
Suite #120
East Lansing, MI 48823
1-888-Mapping
http://www.mappingsolutions.com
Pricing
Map-In-A-Box Solo - $1,295 (For users that already have MapPoint 2002)
Map-In-A-Box North America - $1,495 (includes MapPoint 2002 North America)
Map-In-A-Box Europe - $1,495 (includes MapPoint 2002 Europe)
Introduction
Map-In-A-Box is an add-on to MapInfo Professional 6.0 (or higher) that
seamlessly integrates Microsoft’s MapPoint 2002 functionality into MapInfo
Professional. Mapping Solutions, LLC currently has a Beta version of Map-In-A-Box
for ESRI’s ArcGIS system. Map-In-A-Box is available in a North American
version and a European version. The North American version includes seamless
geographic data for the United States and Canada while the European version
has seamless geographic data across the European Union including Austria,
Belgium, Denmark, France, Germany, Italy, Luxembourg, Netherlands, Spain,
Switzerland and United Kingdom
The software and data comes on two CD’s with an Installation CD and a Run CD with the appropriate MapPoint 2002 geographic data. The following list provides the MapPoint functionality that is available in MapInfo Professional using the Map-In-A-Box add-on:
1. Street-level data available within MapPoint can be viewed directly
within MapInfo Professional. The current map view is automatically refreshed
with the street level data every time the map view is altered by panning
around or zooming in and out of the map. Multiple windows of different
raster styles can be displayed.
2. Street-level geocoding.
3. Address searching and a Reverse geocoding ‘info tool’.
4. Drive-time analysis.
Getting Started
To run the Map-In-A-Box application, open MapInfo Professional and
select the “Run MapBasic Program” command from the Tools menu and locate
the MapInABox.mbx file in the Map-In-A-Box application directory. The MapInABox.mbx
will add a new toolbar with four buttons and a new menu to the MapInfo
user interface as shown in Figure 1. The Map-In-A-Box menu and toolbar
can be removed from the MapInfo workspace by selecting the “Exit Map-In-A-Box”
from the Map-In-A-Box menu.
To add the MapPoint data, users should choose “New Map” from the Map-In-A-Box menu to load a single layer of all the MapPoint data into MapInfo’s Layer Control dialog box. The “Preferences” option allows the user to specify either the North American or the European geographic regions for their map, and the default font and map style. Users can add MapInfo Professional layers to the map window that contains the MapPoint map.
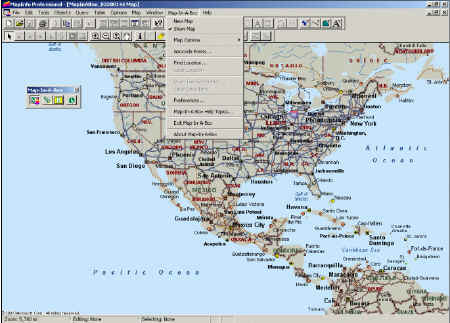
Figure 1: Map-In-A-Box menu and toolbar in MapInfo Professional
v. 7.0
Individual layers of information within Map-In-A-Box map cannot be turned on or off, nor can their styles overridden through MapInfo’s Layer Control dialog box. To show the map, users select or unselect the “Show Map” command in the Map-In-A-Box menu or using the Show Map button on the Map-In-A-Box toolbar. Map-In-A-Box provides users the option to change the Fonts sizes and the Map Style from the “Map Options” command. The font sizes can be changed among the five font options provided with Map-In-A-Box: Smallest, Smaller, Medium, Larger, and Largest. There are five map styles that the Map-In-A-Box map can be changed to: Road Map, Road and Map Data, Data Map, Terrain Map or a Political Map.
Geocoding
The “Geocode Points” command in the Map-In-A-Box menu allows a user
to create a point layer of address information geocoded against the MapPoint
data. Map-In-A-Box can geocode addresses to the street-level with the North
America or European data. Figure 2 shows the options available to geocode
addresses with the MapPoint data. The dialog box has drop-down boxes to
specify the table, the address fields in the data, Geocoding options and
a symbol style. The user will need to specify the Country option as either
the United States or Canada with the North American data or the appropriate
country for the European data. The geocoding process will begin immediately
once the user presses the OK button. After the geocoding process is complete,
the user will see the match results from the geocoding process. The users
can then go back to the Geocode Table dialog box and choose Interactive
mode to view the addresses one at a time or change other geocoding options.
Users can add the geocoded point layer to the map by opening the Layer
Control dialog box and adding the geocoded point layer.
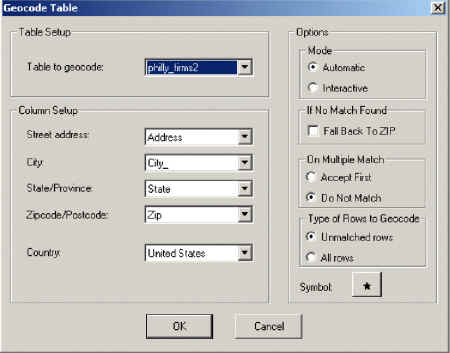
Figure 2: Geocode Table options
Address Finding/Reverse Geocoding
The “Find” command can be accessed in the Map-In-A-Box menu or by pressing
the flashlight button on the Map-In-A-Box toolbar. A dialog box will appear
with three tabs to specify the Find criteria: Address, Place/Data and Lat/Long.
I specified the address in the Figure 3 and the highlighted address displays
the address that Map-In-A-Box found. I pressed the OK button and the map
recentered on the location of the address and placed a label callout box
with the address information, but the map stayed at the same scale which
was the entire US at that time. I zoomed in to the location of the address
and entered another address. This time the map centered to the new address
but kept the same scale from when I zoomed in on the first address. Map-In-A-Box
uses the current scale of the map when using the “Find” command as opposed
to automatically zooming in to the address location.
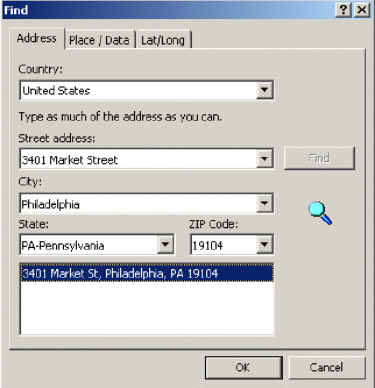
Figure 3: Find dialog box for Addresses, Place/Data and Lat/Long
One of the interesting features of Map-In-A-Box is the ability to reverse
geocode so you can place your cursor over a street and get the interpolated
address of that location. The Street Info button on the Map-In-A-Box toolbar
allows the user to click on the location on a street which will then place
a label callout box with the address at that location. Figure 4 shows an
example of the address label that is placed when the user places a point
on a street with the Street Info button.

Figure 4: Reverse Geocode label
Drive Time Generator
The Drive Time Generator allows the user to create polygons based on
the time in minutes from a selected group of points. Figure 5 shows the
Zone Setting options to specify the amount of time for up to three drive
zones, Frame and Fill Patterns, and other settings to create the zones
with fill patterns and using Non Overlapping bands. The Speeds button allow
the user to enter the speed limit information for highways, limited access
highways, streets, etc. that will be used for the Drive Zone time calculation.
Once the user has specified Drive Zone options, pressing the OK button
will add the Drive Zones to the map and as a layer in the Layer Control
dialog box.
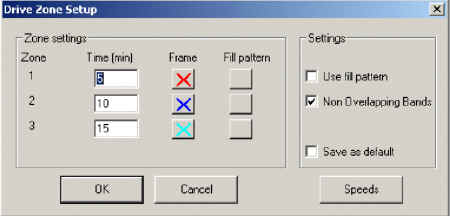
Figure 5: Drive Zone Setup dialog box
To clear the Drive Zones from the map, the user can simply choose the “Clear Drive Time” command from the Map-In-A-Box menu. The drive times will be removed from the map, but the layer will remain in the Layer Control dialog box to store other drive time analysis. The Drive Zones layer can be saved as a MapInfo .tab file if the user would like to save the boundaries of a drive-time analysis for future reference.
Conclusion
Map-In-A-Box provides the data and functionality of Microsoft’s MapPoint
2002 as an add-on to MapInfo Professional. The product can be purchased
solo for users that already have licensed copies of MapPoint, or the product
can be purchased with the MapPoint data for North America and/or Europe.
The integration of the MapPoint data within MapInfo is very useful for
users that want to view seamless maps that cross country boundaries, geocode
data and find street data in multiple countries.
One minor suggestion that I would have would be for Map-In-A-Box to
be included in MapInfo’s Tool Manager when the program is installed as
opposed to having to “Run MapBasic Program” each time to add the menu and
tools to the user interface. This way the user could simply check on or
off whether they want to use the Map-In-A-Box add-on. I copied the .mbx
file into the MapInfo Tools directory and added the .mbx file to the MapInfo
Tools Manager manually so that I didn’t have to keep running the MapBasic
program each time I wanted to use Map-In-A-Box.