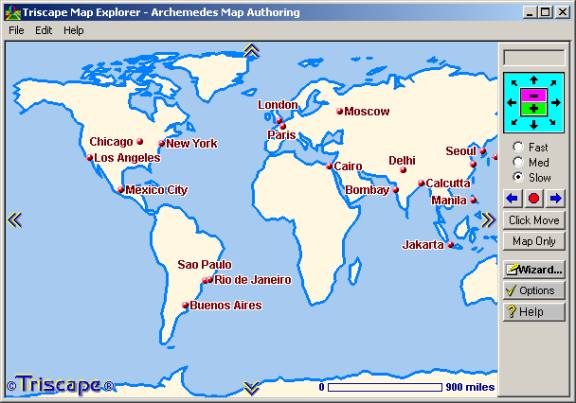
Figure 1: Archemedes Map Authoring
The toolbar is
shown on the right side of the map, but it can be docked to a different
position by pressing the Options button. The light blue box with the arrows
and plus (+) sign in green and minus (–) sign in purple are used to navigate
around the map. The + and – signs will zoom in and out on the map, while
the arrows will move the map in the direction that was pressed. Users can
also move around the map by pressing on the arrows that are located directly
on the map. By pressing the Map Only button, the arrows on the map will
disappear. The tools that are shown on the Authoring interface are the
same tools that will be shown on the web page once it is published to the
Internet.
The Click Move button will move the map continuously when the button is pressed. For example, if you have the Click Move button pressed and you press the + sign, the map will continuously zoom in until it reaches a certain scale, or the User can press the Stop button between the two blue arrows. The Fast, Med and Slow radio buttons control how fast the map moves when you have the Click Move button pressed. The Left and Right Arrow buttons around the stop sign are like Back and Forward buttons on an Internet browser and move the map to back and forth to previous map scales.
The Wizard button on the right is used for creating and publishing maps or you can choose New Map Authoring Wizard from the File menu. See Figure 2 for the Map Authoring Wizard.

Figure 2: Archemedes Map Authoring
Wizard
Once the Wizard starts you can choose Step 1 to Create a New Regional Road Map and then press the Next button. You will be asked where you want to create the map, either on the Triscape.com server or if you want to create the map on your own server. I originally tried to publish the map to my web server several times but ran into all sorts of errors. I called Triscape’s support line and they recommended that I use the Triscape.com server to publish the maps. Once I did that, I had my regional map published within minutes. If you do publish from your own server, you have to upload all the data (375 Mb) to your server so the maps can be served.
After choosing to use the Triscape.com server, I started to create a Regional Map using the authoring software. The software added the U.S. state boundaries and other layers to the map of the countries shown in Figure 1. Besides the state boundaries, other layers were added and set as scale dependent layers so you have to zoom in to see the roads, parks, waterways, etc. I zoomed into an area in Philadelphia to see more of the layers that come with the software. Triscape recommends that you zoom into a small area before you publish a map to avoid excessive uploading times.
Users that want to publish maps with their own server, can add other layers to the map by choosing Step 2: Add a New Item to the Road Map. There's a dropdown list of layers in the Edit Map dialog box with layers such as Airports, Landmarks, Rivers, etc. You transfer the data to your server using Step 3: Transfer the Regional Map to your Web Server. Steps 2 & 3 will be grayed out on the New Map Authoring Wizard if you choose to use the Triscape.com server. The Items that can be added appear to be a fixed set of layers specifically created to work with the Authoring software. You can add a Site Icon that allows you to add custom icons from Bitmap images or GIF’s URL large floating image to denote the location of a particular map feature. Triscape recommends that the limit you bitmaps to the standard 15x15 pixel format, but they do support GIF’s larger than 63x63 pixels.
The next step in the Map Authoring Wizard is to Create an Overlay Map on Your Hard Disk. Overlay maps are created to publish custom annotations such as adding a custom site with a custom icon. You are given the option of a Standard Overlay Map or a Large Overlay Map. The Standard Overlay Map is used if you are publishing with the Triscape.com server and the Large Overlay Map should be chosen if you are publishing with your own server. Based on which Overlay map you choose, Step 6: Transfer the Overlay Map to your Web Server or Step 7: Publish the Current Map via HTML will be grayed out. I chose the Standard Overlay Map since I was publishing the map with the Triscape.com server. When I was ready to publish the map in Step 7, I was presented with the dialog box shown in Figure 3:
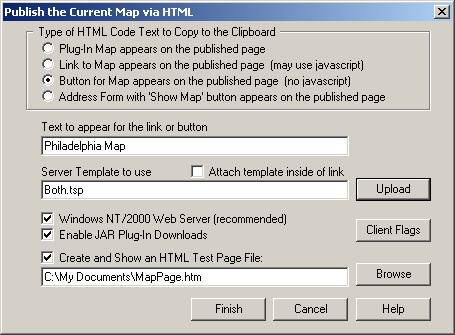
Figure 3: Publish the Current
Map via HTML dialog Box
The user will choose
the type of HTML code with the radio buttons in the first section. The
map authoring software automatically generates the HTML code that can be
copied onto an exiting web page. The Plug-In Map creates the HTML code
to copy into an existing web page. However, the plug-in for the software
is Windows-based so people viewing the map have to be using a Windows-based
browser to use the plug-in to view the map. By setting the HTML code as
a Link or a Button, the map server will automatically determine the type
of browser and will either let the user use the plug-in to move around
the map or will show static images of the map for browsers that are not
Windows-based. You can also add the text to appear on the Link or button
and create a test-page file on your hard drive. When you choose Finish,
you will be asked for a title of your map and a caption to appear below
the map. The wizard will create a test page HTML file or will copy the
HTML code to the clipboard so that you can paste the code directly into
a web page. I created the button below that will take you to the map that
I published using the Triscape.com server.
![]()